One of the things that has worked out for me while learning a new language or framework is to create a small app as soon as I have learned a few crucial concepts. What better way to learn than to apply concepts directly to a practical project? In my case, I learned about React Hooks and Contexts a few days ago. It took me a couple of days to get a grasp of the idea, but I managed to create my first React app on day 5 of learning React. In this blog post I will go into the details of the app and provide my favorite resources when it comes to learning React.
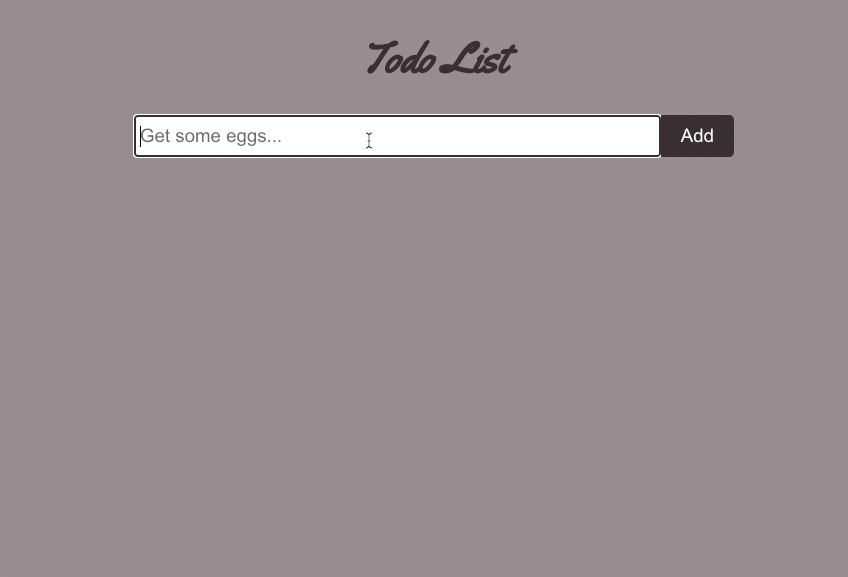
The app is a simple to-do list app, but I tried my best to expose myself to concepts that seem daunting to some (including myself) in the beginning. These were primarily Hooks and Contexts. By reading this blog post, I hope that you’ll gain a deeper understanding of Hooks and Contexts and you’ll have made your own custom hook (yay!). Check it out:
Alright! Let’s get started with React Hooks.
Let’s talk about React Hooks
You’ve probably heard this term many times while learning React, and there’s a reason for that. React hooks play a crucial part in almost every React app you’ll create. That’s why it is important to understand what they are. Let’s take a look at the official React docs and see what React hooks are (link):
Hooks are functions that let you “hook into” React state and lifecycle features from function components. Hooks don’t work inside classes — they let you use React without classes.
Let’s make sense of that. Before hooks, if you ever wanted to use states in your components, you needed to use classes. States are objects that hold information, when states are updated it forces the component to re-render. With hooks, you can now incorporate states within your functional components using useState().
So… what states will we need in the case of our to-do list app? The first question to think about is what are some things that you are storing/holding? What are the things, that when updated, you’d like the component to re-render? What first comes to mind is an array of tasks. A user should be able to write a task, click the add button and have the task appear in the table below. So, we’ll need to use states to keep track of these tasks. A task object will have the following structure:
{
  id: v4(),
  task,
  complete: false
}
Where id is a unique identifier using v4() from the uuid library. We’ll use this identifier when we want to refer to a specific task. For example, when a user wants to complete a task, it would be easier if we had a unique identifier for us to know which task the user is referring to.
A Primer on React Contexts
Before we start talking about React Contexts, it’s important to understand the different approaches you can take when it comes to state management for this app.
One approach is to have the necessary states being handled by the component itself, for example, managing the state of tasks in the TaskList component. However, over time, this approach will result in states being all over the place, and in larger applications it will be more difficult to debug.
Another approach is to handle all states at the root of your app. That is, storing all possible states that your entire app needs to manage in the App component. You might think that this would solve the issue, however, let’s say you have a Task component that takes care of displaying a single task. You also have a TaskList component that contains a bunch of Task components. When you complete a task, you must pass the new state backwards all the way to the root. That would mean that the state must be passed from Task to the TaskList to the App. Now think about what would happen if instead of a single stop in between, you had 5+ components. This nesting will result in a very inefficient way of passing state changes between components that don’t even care about the change of the state. That means, when you complete a task, the TaskList doesn’t care and doesn’t need that information, the App needs it. There are probably other ways to manage states, but if you’re still confused, this might clear it up:
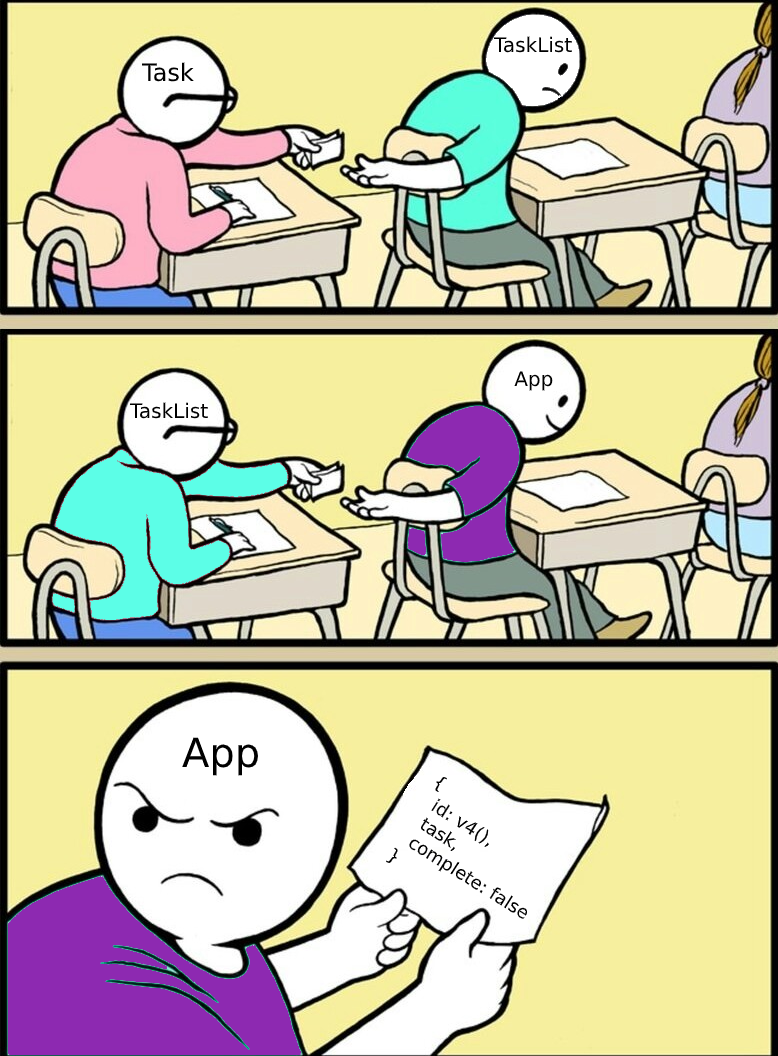
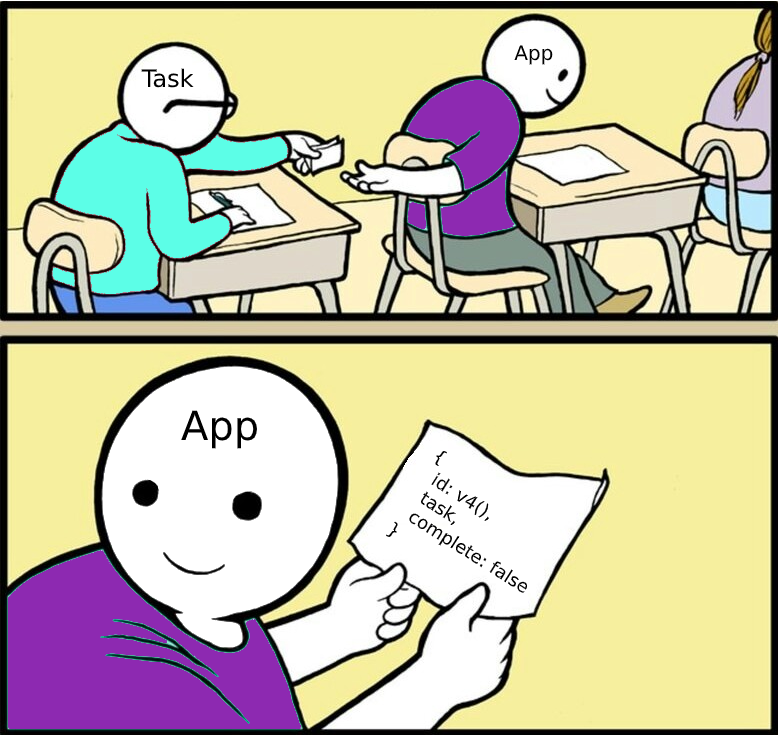
This is where contexts come in. You can setup a context provider and wrap it around your app or the part of the app that uses the to-do list. This context provider will let us have the best of both worlds. We will still store our states in a single location, but when passing data around, it doesn’t need to pass through components that don’t need this data. In this case, the Task component will be the context consumer as it will make use of this context provider to pass data directly to the root of the app. Visually, this is what’s happening:
Now that you see the advantage of using React contexts, let’s create our own context provider and a custom hook that allows us to communicate with that context. That way, the other components can pass data directly to the context without dealing with any intermediary components.
Writing our own Context Provider
I will first show you the code of our context provider (stored in TaskProvider.js), and then we can walk through what the code actually does:
// 1
import React, {createContext, useState, useContext} from 'react'
import { v4 } from "uuid"

// 2
const TaskContext = createContext()
export const useTasks = () => useContext(TaskContext)

export default function TaskProvider({ children }) {
  // 3
  const [tasks, setTasks] = useState([])

  // 4
  const addTask = task =>
      setTasks([
          ...tasks,
          {
              id: v4(),
              task,
              complete: false
          }
      ])

  // 5
  const setStatusTask = (id, status) => {
      setTasks(tasks.map(t => t.id === id ? {...t, complete: status} : t))
  }

  // 6
  return (
      <TaskContext.Provider value={{ tasks, addTask, setStatusTask }}>
          { children }
      </TaskContext.Provider>
  )
}
- In the first line we import React and two hooks (
useStateanduseContext) that we’ll be using, as well ascreateContext. - Here we use createContext to create, well… a context. Context consumers can access the states. We also create our own hook—
useTasksthat callsuseContexton the context we just created. This is just to make it easier for other components to get access to the tasks array and other necessary helper functions. - We use the
useStatehook and pass it the default value, a list of tasks which will be an empty array in our case.useStatereturns an array of two objects, the value of the state (i.e. the array of tasks) and a function that can be used to change that value. - Here we create an
addTaskfunction that other components will be able to use in order to add a task. We usesetTasksto changetasksto what it originally was plus the new task with a uniqueidusingv4(). Note that we could have skipped this and just gave components access tosetTasks. The problem with that is it gives other components access to functionality you might not want to be possible, like deleting a task. - We create a
setStatusTaskfunction that takes in the id of the task and its new status, and maps all tasks to: 1) itself if theiddoesn’t match or 2) to a new task wherecompleteis set tostatusif theidmatches. - We wrap the children in our Context Provider so that they have access to it and then we return.
Now that we have our Context Provider, the rest should be easy. We need to create a couple of components. Namely, we need to create a Task component that represents a single row in the table of tasks. We need a TaskList component which represents the table holding the list of tasks. Finally, we need a NewTaskForm component that takes care of providing an input for users to add a new task.
Coding up our React Components
Let’s start with the Task component (in the Task.js file):
// 1
import React from 'react'
import { useTasks } from './TaskProvider'

export default function Task({ id, task, complete }) {
  // 2
  const { setStatusTask } = useTasks()

  // 3
  const checkTask = e => setStatusTask(id, e.target.checked)

  return (
    <tr>
      <td>
        // 4
        <input type="checkbox"  onChange={checkTask} />
      </td>
      <td>
        // 5
        <span className={ complete ? 'task-done' : '' }>{ task }</span>
      </td>
    </tr>
  )
}
- As before, we’re just importing React and our custom hook,
useTasksfrom theTaskProviderin order to get access to thesetStatusTaskfunction when a user completes a task. - Here we use object destructuring to extract
setStatusTaskfromuseTasks(). - We create a function
checkTaskthat will be called every time a user clicks on the checkbox of a task. - Here we create a checkbox with
onChangeset tocheckTaskin order to achieve the functionality in the previous point. - Here we display the task. The task can have the
task-doneclass in which we have the corresponding CSS to add a strike-through effect indicating that the task is done. We determine whether a task should have this class or not depending on thecompletevariable of the task object.
Now let’s create our TaskList component (in the TaskList.js file):
// 1
import React from 'react'
import Task from './Task'
import { useTasks } from './TaskProvider'

export default function TaskList() {
  // 2
  const { tasks } = useTasks()
  return (
    <table>
      <tbody>
        {
          // 3
          tasks.map((task, i) =>
            <Task key={i} {...task} />
          )
        }
      </tbody>
    </table>
  )
}
- We’re importing React, the
Taskcomponent and our custom hook,useTasksin order to get the list of tasks the user has. - We use object destructuring to extract
tasksfromuseTasks(). - For each task in the array of tasks, we transform it into a Task component with a unique key (to avoid console errors) and pass in the task object.
And finally, let’s create the NewTaskForm component (in the NewTaskForm.js file):
// 1
import React, { useState } from 'react'
import { useTasks } from './TaskProvider'

export default function NewTaskForm() {
  // 2
  const [task, setTask] = useState('')
  const { addTask } = useTasks()

  // 3
  const submit = e => {
    e.preventDefault()
    addTask(task)
    setTask('')
  }

  return (
    // 4
    <form onSubmit={submit}>
      // 5
      <input type="text" value={task} placeholder="Get some eggs..." onChange={e => setTask(e.target.value)} required />
      <button>Add</button>
    </form>
  )
}
- We import React, the
useStatehook to keep track of what the user is writing in the text field and our custom hook,useTasksto get access toaddTask. - We use the
useStatehook with a default value of""to monitor the current task the user is inputting. We use array destructing to gettask(the current string the user is writing) andsetTask, the function we’ll use when we want to modifytask. - Here we create a
submitfunction that will be called when the user clicks the “Add” button. It will useaddTaskto add the task to our context. It will also resettaskwhich as a result clears the input. - We create a form with
onSubmitset tosubmitso that the function gets called when the user submits the form. - Finally we create an input with a value of
taskandonChangeset to an arrow function that usessetTaskto change the value oftaskto the current value of the text field.
That is all for the components we need. Now we have to connect everything together to get a functional app.
Connecting the dots
Let’s now use all of our components to connect everything together. In the App.js file we have the following:
// 1
import React from 'react'
import './App.css'
import './Todo.scss'
import NewTaskForm from './NewTaskForm'
import TaskList from './TaskList'

function App() {
  // 2
  return (
    <div className="container">
      <h1 className="title">Todo List</h1>
      <NewTaskForm />
      <TaskList />
    </div>
  )
}

export default App
- We import React, the CSS files and the two components. Namely,
NewTaskFormandTaskList. - Here we render a div containing the title, the form and the task list.
The only other change we need to make is in the index.js file where we use the TaskProvider component we created to wrap the entire app in the context:
// 1
import React from 'react'
import ReactDOM from 'react-dom'
import './index.css'
import App from './App'
import TaskProvider from './TaskProvider'

// 2
ReactDOM.render(
  <TaskProvider>
    <App />
  </TaskProvider>,
  document.getElementById('root')
)
- We import React, ReactDOM, the CSS, the
AppandTaskProvidercomponents. - We render the
Appcomponent within theTaskProviderto give the entire app access to the context. Note that we could’ve wrapped a portion of the app instead, but for the sake of simplicity we’ll wrap the whole app.
That’s it, the app is now ready for testing, but first, let’s add some styles!
Finishing Touches and Styling
Since this blog post focuses on the React aspect of this app, I will not be explaining the scss below, however feel free to reach out to me if something doesn’t make sense. The only important thing to keep in mind is the .task-done class which sets text-decoration to line-through to get the strike-through effect. Here is the code for styles (in the Todo.scss file)
@import url('<https://fonts.googleapis.com/css2?family=Yellowtail&display=swap>');

body {
  width: 100%;
  height: 100%;
  background-color: #A6979C;


  .container {
    display: flex;
    flex-direction: column;
    align-items: center;
    width: 600px;
    max-width: calc(100% - 20px);
    margin: 0 auto;

    .title {
      font-family: 'YellowTail', sans-serif;
      font-size: 32pt;
      color: #42383B;
    }

    .task-done {
      text-decoration: line-through;
    }

    form {
      width: 100%;
      display: flex;

      input[type="text"] {
        height: 30px;
        width: 100%;
        border: 1px solid #ccc;
        border-radius: 5px 0 0 5px;
        padding: 5px;
        outline-color: #42383B;
        font-size: 14pt;
      }

      button {
        background-color: #42383B;
        color: #fff;
        border: 0;
        padding: 0 20px;
        border-radius: 0 5px 5px 0;
        font-size: 14pt;
      }
    }

    table {
      width: 100%;
      border-collapse: collapse;

      td:first-child {
        table-layout: fixed;
        width: 20px;
      }

      td:nth-child(2) {
        padding: 10px 20px;
        font-size: 14pt;
      }

      tr:nth-child(even) {
        background-color: #8E7B81;
      }
    }
  }
}
Conclusion
After this long in-depth blog post about how to create a simple to-do list app, I hope you learned a thing or two about React Hooks and Contexts and how you can utilize them within your own applications. If it was hard to understand, don’t worry. It took me a couple of days to understand what was going on, but it feels good to be able to put all of these concepts together into a single project.
As I said before, some of the resources I used to learn about these include:
- Learning React By Alex Banks and Eve Porcello.
- The official React documentation. Most importantly in this post:
If you have any questions, reach out to me, I’ll be more than happy to help. Also, make sure you follow me on Twitter @oohsinan where I post about full-stack development (mostly React).